

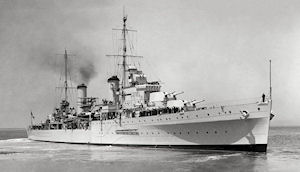
HMAS Sydney II
Light Cruiser
| Data | |
| Type: | Modified Leander Class Light Cruiser |
| Displacement: | 6,830 tons |
| Length: | 562 feet 3 inches |
| Beam: | 56 feet 8 inches |
| Builder: | Swan, Hunter and Wigham Richardson Ltd, Wallsend on Tyne, England |
| Laid Down: | 8 July 1933 (as PHAETON) |
| Launched: | 22 September 1934 (as SYDNEY), by Mrs Bruce, wife of the Australian High Commissioner, United Kingdom |
| Horsepower: | 72,000 |
| Speed: | 32.5 knots |
| Armament: | 8
x 6-inch guns, 4 x 4-inch guns, 3 x 5mm machine guns, 12 Lewis Guns, 8 x 21 inch torpedo tubes (in 2 quadruple mounts) |
| Complement: | 376 |
| Commanding Officers | |
| 24 September 1935 | Captain J.U.P. Fitzgerald RN |
| 9 October 1937 | Captain J.W.A. Waller RN |
| 16 November 1939 | Captain J.A. Collins RAN |
| 14 May 1941 | Captain J. Burnett RAN |
 After being laid down in 1933 for the Royal
Navy as PHAETON, SYDNEY was purchased (before launching) by the
Australian Government in 1934 and renamed in memory of the earlier
SYDNEY that destroyed the German cruiser EMDEN in 1914.
After being laid down in 1933 for the Royal
Navy as PHAETON, SYDNEY was purchased (before launching) by the
Australian Government in 1934 and renamed in memory of the earlier
SYDNEY that destroyed the German cruiser EMDEN in 1914.
The ship commissioned at Portsmouth on 24 September 1935, under the
command of Captain John U.P. FitzGerald RN, and spent the early part
of her career on the Mediterranean station.
Arriving on the Australia Station on 2 August 1936 SYDNEY remained
in home waters until the outbreak of war and was in Fremantle on the
day war was declared. On 16 November Captain J.A. Collins RAN,
assumed command from Captain John W.A. Waller RN, who had succeeded
Captain FitzGerald in 1937.
SYDNEY remained on local patrol duties until April 1940 when she
sailed from Fremantle as part of the escort for a large Middle East
bound convoy. Parting company in the Indian Ocean, the cruiser
arrived in Colombo on 8 May 1940.
On 19 May 1940 she proceeded to the Mediterranean and arrived in
Alexandria on 26 May where she joined the 7th Cruiser Squadron of
the Royal Navy. SYDNEY experienced her first action when, in company
with HM Ships ORION and NEPTUNE, the French Battleship LORRAINE and
destroyers DAINTY, DECOY, HASTY and STUART, she took part in the
bombardment of Bardia on 21 June 1940.
 On 28 June 1940 SYDNEY in company with other ships of the 7th
Cruiser Squadron, encountered three Italian destroyers. The action
which followed resulted in the sinking of ESPERO. Fought at dusk in
the fast failing light, two of the destroyers succeeded in evading
the British cruisers. In this action, a minor one, SYDNEY's part
consisted chiefly in finishing off the crippled destroyer and
rescuing 47 Italian survivors.
On 28 June 1940 SYDNEY in company with other ships of the 7th
Cruiser Squadron, encountered three Italian destroyers. The action
which followed resulted in the sinking of ESPERO. Fought at dusk in
the fast failing light, two of the destroyers succeeded in evading
the British cruisers. In this action, a minor one, SYDNEY's part
consisted chiefly in finishing off the crippled destroyer and
rescuing 47 Italian survivors.
On 1 July 1940 SYDNEY returned to Alexandria, where she remained
until 7 July when she proceeded as part of the covering force for
Malta convoys. On the following day, she joined the Mediterranean
Battle Fleet. Severe air attacks, four of them directed at SYDNEY,
were all successfully beaten off by anti-aircraft fire. The
following day, 9 July, she took part in the first full scale action
with the Italian Fleet.
The British forces engaged in this action, which was fought off
Calabria were as follows:
Battleships
HMS ROYAL SOVEREIGN
HMS WARSPITE
HMS MALAYA
Aircraft Carrier
HMS EAGLE
Cruisers
HMS LIVERPOOL
HMS NEPTUNE
HMS ORION
HMAS SYDNEY
Plus attendant destroyers.
Aircraft from HMS EAGLE first reported the Italian fleet to the
north of the British Forces. The Commander in Chief, Admiral Sir
Andrew Cunningham (WARSPITE), thereupon promptly altered course to
the northward. At 1445, HMS NEPTUNE reported sighting four Italian
cruisers, and at 1500 the entire fleet came into view, consisting of
2 battleships, 10 cruisers and 24 destroyers. Meanwhile the vanguard
of the British Fleet, consisting of the four cruisers, LlVERPOOL
NEPTUNE, ORION and SYDNEY under Vice Admiral J.C. Tovey (7th Cruiser
Squadron), altered course to avoid becoming heavily engaged without
the support of WARSPITE's heavy armament.
 With the sun behind them, the Italian cruisers opened fire at 1515.
The British cruisers, though outnumbered, engaged the enemy until
1545, when WARSPITE opened fire. The battleship's fire forced the
enemy to turn away under cover of smoke, after which there was a
lull in the battle. At this stage, the British cruisers were
advancing north west towards the enemy, with WARSPITE astern. MALAYA
and ROYAL SOVEREIGN, who had been some distance away, were fast
approaching the scene of action and the British destroyers were
concentrating for attack.
With the sun behind them, the Italian cruisers opened fire at 1515.
The British cruisers, though outnumbered, engaged the enemy until
1545, when WARSPITE opened fire. The battleship's fire forced the
enemy to turn away under cover of smoke, after which there was a
lull in the battle. At this stage, the British cruisers were
advancing north west towards the enemy, with WARSPITE astern. MALAYA
and ROYAL SOVEREIGN, who had been some distance away, were fast
approaching the scene of action and the British destroyers were
concentrating for attack.
At about 1550, WARSPITE succeeded in straddling the Italian
battleship GlULIO CESARE and a 15" shell hit forward near her
foremost funnel. Soon after 1600, WARSPITE, which had been firing at
extreme range, attempted to close the enemy. MALAYA opened fire, but
her heavy salvoes all fell short. Meanwhile, the British cruisers
had renewed the action and attempted to close the enemy who was
rapidly drawing away to the north. By 1611, only one enemy ship
remained within range, at something over 20,000 yards and at 1619,
SYDNEY turned her attention to enemy destroyers laying smoke.
Shortly afterwards, the British destroyers moved in to attack. By
1640, the battle was over and the last gun fired. A number of
bombing attacks on the battle fleet developed between 1646 and 1930.
SYDNEY came through unscathed, though a stick of bombs straddled the
ship. HMS EAGLE, an obsolescent aircraft carrier, despatched nine of
her seventeen embarked Swordfish to attack the Italian Fleet. In
spite of heavy anti aircraft fire, all planes pressed home their
attack and succeeded in launching torpedoes, but no hits were
observed. All aircraft returned safely.
SYDNEY remained at sea with the Fleet until 13 July 1940 when she
returned to Alexandria.
On 18 July 1940, SYDNEY with destroyer HAVOCK in company, sailed
from Alexandria. Her orders were to support the destroyers HYPERION,
ILEX, HERO and HASTY engaged on a submarine hunt off Crete, and
destroy enemy shipping in the Gulf of Athens. The two ships arrived
off Crete at sunset and passed through Kaso Strait shortly before
midnight.
Early on the morning of 19 July SYDNEY and her attendant destroyer
reached a point some 40 miles north of Cape Spada. The day had
dawned calm and cloudless, with some light mist. At 0733, SYDNEY
received a report from the destroyers indicating the presence of two
enemy cruisers some 10 miles to the south west of their position,
heading north.
Altering course and proceeding at maximum speed, SYDNEY and HAVOCK
headed towards the enemy, and at 0820 sighted smoke on the horizon.
A few minutes later two Italian cruisers, BARTOLOMEO COLLEONI and
GIOVANNI DELLE BANDE NERE, were sighted on the starboard beam, at a
range of some 23,000 yards, course ENE.
At 0829, SYDNEY opened fire on the leading cruiser GIOVANNI DELLE
BANDE NERE. At 0832, both cruisers replied to SYDNEY's fire. None of
the enemy shells scored a hit, though some salvoes succeeded in
straddling. Within six minutes of opening fire, hits appeared to
have been registered on GIOVANNI DELLE BANDE NERE on which ship
SYDNEY continued to concentrate her fire. At 0838, HYPERION, HASTY,
HERO and ILEX were sighted to the south east, at a distance of some
six miles. At this time, the enemy attempted to escape to the south
west and by 0846, SYDNEY, with the destroyers in line abreast and in
fairly close order, was chasing the enemy at full speed, the
destroyers having also opened fire.
By 0848, GIOVANNI DELLE BANDE NERE was obscured by smoke, and SYDNEY
therefore shifted her fire to BARTOLOMEO COLLEONI at a range of
18,000 yards. At 0851, the two enemy cruisers suddenly altered
course to port and at 0853, appeared to be turning to starboard,
eventually coming back to their original south westerly course,
having left a large smoke cloud behind them. The Italian cruisers
were faster than SYDNEY, and were slowly growing away at a speed in
the region of 30 knots. At 0902, SYDNEY again opened fire on
GIOVANNI DELLE BANDE NERE at 21,000 yards and fired until 0908, when
heavy smoke again forced a shift of target to the rear cruiser.
By 0919, SYDNEY's fire on BARTOLOMEO COLLEONI appeared to be taking
effect and the range had closed to 17,500 yards. Meanwhile, both
cruisers continued to reply with fairly accurate fire and at 0921,
SYDNEY was hit in the foremost funnel. Only one minor casualty
resulted. The range was now closing rapidly and at 0923, BARTOLOMEO
COLLEONI was finally put out of action, some 5 miles off Cape Spada.
The surviving cruiser rounded Agria Grabus Island to the north, and
retired at full speed to the south west, hotly pursued by SYDNEY who
was almost directly astern.
A 0933, Captain Collins ordered the destroyers to finish off
BARTOLOMEO COLLEONI with torpedoes, SYDNEY ceasing fire at 0938,
when the range was 7,500 yards. The destroyers HYPERION and ILEX
then fired torpedoes at BARTOLOMEO COLLEONI and the destroyer HAVOCK
stood by to rescue survivors. BARTOLOMEO COLLEONI finally sank at
0959. Meanwhile, SYDNEY, in company with HERO and HASTY, continued
the pursuit of GIOVANNI DELLE BANDE NERE who had continued on
southward at full speed. The fleeing cruiser kept up a desultory
inaccurate fire, but SYDNEY did not reply until 0958 at a range of
20,000 yards. The chase continued until 1011 when the fast opening
range and haze conditions made overhauling unlikely.
At 1037, the chase was abandoned, and SYDNEY headed for Alexandria
as fuel and ammunition needed replenishing. Before reaching
Alexandria, SYDNEY and the destroyers suffered repeated air attacks.
HAVOCK sustained a direct hit. On 20 July all British ships reached
Alexandria safely.

During August SYDNEY took part (as a covering force) at the second
bombardment of Bardia. In September, she spent her longest period in
harbour since entering the Mediterranean, when she docked in
Alexandria on the 8th, and remained in port until 24 September 1940.
In October, operating with the Mediterranean Fleet, she took part in
a sweep of the Adriatic. In November, she was engaged in protecting
the convoys to Greece and in operations in the Straits of Otranto,
when an Italian convoy was successfully attacked during the hours of
darkness of the night of 12/13 November. December 1940 saw SYDNEY
again covering convoys to Greece and Malta and further operations in
the Adriatic and Straits of Otranto, as part of the Mediterranean
Fleet. On 23 December 1940 she put into Malta for a refit, sailing
again on 8 January 1941.
On 11 January 1941 SYDNEY sailed from Alexandria for the last time
and reached Fremantle, following convoy duties, on 5 February 1941.
Sydney arrived in her namesake harbour shortly before midnight on Sunday 9 February 1941, anchoring in Watson’s Bay. The following morning she weighed anchor and slowly made her way down the harbour towards her assigned berth at Circular Quay, amidst an escort of scores of motor launches carrying excited relatives and friends.
Admiral Cunningham’s hope that the men of Sydney would ‘get the reception they deserved’ was certainly fulfilled, for when the cruiser arrived at the quay she was met by a huge crowd of people who had come to greet her. Many VIPs had also assembled to welcome Sydney home, including the Governor-General, Lord Gowrie, the Minister for the Navy, Billy Hughes and the First Naval Member Sir Ragnar Colvin. Following an addresses from them the crew of Sydney went ashore where they were embraced by their friends and families. News of Sydney’s arrival home dominated the newspapers which covered her return in detail over the next three days, making much of her triumphant return home.
On Tuesday 11 February, the Premier of New South Wales Mr Mair and the City of Sydney Lord Mayor, Alderman Crick came on board the cruiser to present a plaque to the ship commemorating her victory over the Bartolomeo Colleoni on behalf of the citizens of Sydney. The plaque consisted of two large cast medallions mounted on oak and was affixed to the gun housing of ‘Y’ turret below the sighting ports. With the unveiling of the plaque completed, the crew was fallen in on the quay side behind Sydney’s band and they then marched through the streets of Sydney to a civic reception which had been arranged for them at the Town Hall.

Thousands of people turned out to watch the men parade through the city and children were given the day off school so that they too could enjoy the celebration. At the Town Hall, each member of Sydney’s crew was presented with a smaller medallion of the same design as that awarded to the ship, all of which were individually inscribed with the recipient’s personal details.
With the excitement surrounding Sydney’s return abating, and with censorship reapplied to her movements, the Navy turned its attention toward more practical matters, sending Sydney into dry dock for maintenance while her crew was sent on leave.
On 28 February, with her docking completed, the cruiser sailed from Sydney for Fremantle where she began a period of routine convoy escort duties operating off the Western Australian coast. In April she returned to the eastern seaboard escorting the troopship Queen Mary to Jervis Bay before undertaking a high speed passage via Fremantle to Singapore to carry the First Naval Member to a high level Allied conference. While in Singapore it was decided that Captain Collins would be appointed the Australian Naval Representative to the Commander-in-Chief China (based in Singapore) Vice Admiral (Sir) Geoffrey Layton.
And so it was that in Fremantle on 15 May 1941, “Colleoni John”, as he had been nick-named by his crew, handed over command of Sydney to Captain Joseph Burnett, RAN.
Burnett took his new command to sea for the first time between 17-21 May to conduct routine patrols and exercises in the Indian Ocean. On 26 May, Sydney relieved HMAS Hobart as the escort for the troopship Zealandia which was making an easterly passage from Melbourne to Singapore via Fremantle. After a short stop-over in Fremantle the two vessels continued their voyage on 31 May and arrived in the vicinity of the Sunda Strait on 6 June. There Sydney was relieved by HMS Danae before returning independently to Fremantle where she arrived four days later.
Zealandia was to become a familiar sight to the men of Sydney as her next assignment was to provide escort for the troopship during her return passage from the Sunda Strait to Fremantle later in the month. On 24 June, Zealandia was again under Sydney’s watchful eyes as part of a small convoy designated F.S.1 taking passage across the Great Australian Bight bound for Melbourne and Sydney respectively.
Meanwhile in the far distant Indian Ocean there had been a number of disturbing developments. Reports of spurious wireless signals coupled with the unexplained disappearance of several merchant ships had raised concerns that their might be a raider at large. This was indeed the case.
The German Navy’s largest auxiliary cruiser, the Kormoran, now disguised as the Dutch merchant ship M.V. Straat Malakka, had entered the Indian Ocean some months previously and was making her presence felt throughout the region. Adept at subterfuge and with a well drilled and disciplined crew she was more than a match for any unsuspecting merchant ship. Her captain, Kapitän zur See Theodor Anton Detmers, however, had no desire to encounter a warship from what he termed Australia’s ‘grey funnel’ line.
Her next voyage, escorting convoy U.S.12B to Fremantle would see Sydney leave the eastern seaboard for the last time. Never again would she sail through Sydney Heads, never again would she pass the mast of her forebear and never again would she be feted by the citizens of the city whose name she carried. As she shepherded her convoy west, her date with destiny was fast approaching as the Kormoran slowly made her way east towards the Western Australian coast.
Sydney arrived in Fremantle on 25 September and three days later continued on with U.S.12B on the now familiar route to the Sunda Strait where she was relieved by HMS Glasgow. Many of Sydney’s crew viewed this work as being a ‘milk run’ in comparison to the high tempo operations in the Mediterranean, yet there were subtle signs starting to appear, leading some to believe that things were not as benign as they appeared.
One of these signs came on the evening of 3 October when Sydney sighted an object floating on the sea, which on investigation appeared to be a large gunnery target. The wooden structure was recovered by one of Sydney’s boats and hoisted on board where it was examined and dismantled. Captain Burnett reported the discovery to Naval Headquarters in Melbourne stating that it was ‘difficult to find an explanation of this large structure which fitted all the facts’. He went on to express ‘that there is just a possibility that it may have been dropped by a raider’.
Days later an unidentified vessel was sighted by HMAS Yandra eight miles from Rottnest Island in the early hours of the morning of 6 October. The vessel melted into the darkness and in spite of an air search, no trace of it was found. Speculation concerning the identity of the vessel became the subject of considerable attention in the Combined Operations Intelligence Centre summaries over the next few days which again raised the possibility that a raider may have been operating in the area. As a precaution, minesweepers were ordered to operate ahead of Queen Mary and Sydney, both of which were due to arrive in Fremantle, while anti-submarine patrols were maintained during daylight hours.
Sydney sailed from Fremantle on Armistice Day, 11 November, 1941 to escort the troopship Zealandia to Sunda Strait where she was to be relieved by the British cruiser HMS Durban for the last leg of the voyage to Singapore. The voyage was without incident and at noon on the 17 November, Zealandia was turned over to Durban and Sydney then proceeded back to Fremantle where she was expected to arrive on the afternoon of 20 November 1941. She did not arrive as expected and the District Naval Officer, Western Australia , reported accordingly to the Naval Board at 11 a.m. the following day that Sydney was overdue. This did not immediately concern the Naval Board as they had been advised that Zealandia had arrived later than anticipated and it was assumed that Sydney too had been delayed. There was also the possibility that she might have diverted for another purpose and had not broken radio (wireless telegraphy) silence. When however, she had not returned by 23 November, she was instructed by the Naval Board to report by signal. There was no reply.
The reconstruction of events leading up to Sydney's disappearance relies primarily on information gathered from interrogations of German survivors from the raider HSK Kormoran which Sydney engaged on the afternoon of 19 November 1941. The following is an account of Sydney's final action and subsequent loss based on surviving records, extensive research and the findings of a Chief of Defence Force inquiry concerning the loss of Sydney released in July 2009.
Returning from her convoy duties to Java, Sydney was proceeding south along the north west coast of Western Australia when she sighted what appeared to be a merchant vessel at about 1600 on 19 November 1941, some 130 miles west of Shark Bay.
The ship was in fact the Kormoran. Sydney challenged the vessel continuously using her searchlight whilst at the same time closing the range between the two ships. Merchant vessels were known to be less efficient at visual signalling and the Germans exploited this knowledge through their actions on their flag deck and by their slow response to Sydney's visual challenges. At 1700, to further the deception, Kormoran broadcast a 'suspicious ship' message, feigning a cry for help in the name of Straat Malakka.
Sydney's efforts to establish the true identity of the vessel resulted in her closing the range to a point where she no longer had the advantage of her superior armament. At approximately 1715 Sydney had drawn almost abeam of Kormoran to starboard, less than a mile distant. Both ships were steering West-South-West at about 15 knots. Still wary, the Australian cruiser kept her main armament trained on the mysterious ship and her amphibious aircraft was on the catapult with its engine running. She then signalled, both by flags and flashing light; 'Where bound?' Kormoran replied 'Batavia'. The crucial moment then came when Sydney hoisted a two flag signal consisting of the letters 'IK' which the raider could not interpret. They were in fact the two centre letters of the Straat Malakka's four letter secret identification signal (IIKP). With no reply forthcoming Sydney signalled in plain language 'Show your secret sign'.
Finally, when concealment of his vessel's true identity was no longer possible, and with the advantage of surprise, Detmers ordered the Dutch colours to be struck, hoisted the German naval ensign and opened fire at approximately 1730 with all armament at a range 'somewhat more than a mile'.
It is likely that the raider's first salvo destroyed Sydney's bridge, with the result that her primary control was immediately put out of action. Sydney's own guns opened fire almost simultaneously with a full salvo that passed over Kormoran without inflicting damage. Kormoran again scored hits on Sydney with two salvos again hitting her bridge and midships section. According to the Germans all of Kormoran's armament was brought to bear on Sydney, concentrating on her bridge, torpedo tubes and anti aircraft batteries.
For a few seconds after her initial salvo Sydney did not reply. It appears that her forward "A" and "B" turrets were put out of action leaving only her after turrets "X" and "Y" to respond. It was reported by the Germans that Sydney's "X" turret opened fast and accurate fire, hitting Kormoran in the funnel and engine room. "Y" turret is said to have fired only two or three salvos, all of which went over. At about this time one of the raider's two torpedoes struck Sydney under "A" and "B" turrets. The other passed close ahead of the stricken ship, which was subjected to enfilading fire.
With her bow low in the water, Sydney then turned sharply towards Kormoran as though attempting to ram. As she did so, the top of "B" turret was blown off and flew overboard, the cruiser then passed under Kormoran's stern, heading to the southward and losing way. Kormoran, maintaining her course and speed, was now on fire in the engine room where hits by Sydney's "X" turret had caused severe damage. Smoke from the fire hid Sydney from Kormoran's bridge but the raider continued to engage with her after guns as the range opened to approximately 4,400 yards.
At about 1745 Sydney was seen to fire a torpedo when Detmers was turning his ship to port to bring his broadside to bear, however, as he did so Kormoran's engines began to fail. The torpedo track was sighted and it was subsequently avoided. Simultaneously the raider's engines broke down completely.
Sydney, crippled and on fire from the bridge to the after funnel, steamed slowly to the south returning only sporadic fire from her secondary armament. Although by now the range had opened to 6,600 yards Sydney continued to receive steady hits from Kormoran's port broadside. At 1800, at a range of 7,700 yards, Kormoran then fired one torpedo that missed Sydney's stern. Although this fierce action had lasted only half an hour both ships had been dealt mortal blows.
Kormoran fired her last shot at 1825 at a range of about 11,000 yards. The Germans claim to have fired approximately 450 rounds from her main armament and hundreds from her anti-aircraft batteries. With the gathering gloom the form of Sydney disappeared from view and was last seen by the Germans about ten miles off, heading approximately South-South-East. Thereafter, until about 2200, all that was seen was a distant glare then occasional flickerings until midnight at which time all trace of Sydney disappeared.
Of Sydney's total complement of 42 officers and 603 ratings, none survived. This number included six members of the Royal Australian Air Force and four civilian canteen staff. The only material evidence recovered from Sydney was an Australian naval type Carley life-float recovered eight days after the action by HMAS Heros and an Australian naval pattern life-belt recovered by HMAS Wyrallah. The Carley float is now preserved in the Australian War Memorial in Canberra.
Contents of this page were sourced from Sea
Power Centre
More information, pictures & videos are on their website:
http://www.navy.gov.au/hmas-sydney-i